Bootstrap Radio Form
Overview
Sometimes the compact details happen to be the very critical due to the fact that the whole entire pic is in fact a all containing several small components enhanced and compiled for you to look and present as a well-oiled bright machine. These kinds of spicy phrases might possibly look a bit too much whenever it goes to create controls yet in the event that you just consider about it for a little there is only a single element helping the website visitor to grab one among a several obtainable solutions. And so in the event that you're featuring some forms through this sort of selections controls over your various web sites does this mean they will all look identical? And more importantly-- would you settle for that?
Happily for us the latest edition of the absolute most favored mobile phone friendly framework - Bootstrap 4 runs totally loaded having a brilliant new method to the responsive activity of the Bootstrap Radio Toggle controls and just what is bright new for this edition-- the so called custom form controls-- a palette of predefined visual appeals you can surely just bring and apply just to add in the so wanted at presents selection in the functional performances of more or less uninteresting form elements. Therefore let's look precisely how the radio switches are suggested to be defined and designated in Bootstrap 4. ( click this link)
How you can apply the Bootstrap radio button:
To build a radio tab we initially really need a
<div>.form-check.form-check-inline.radio.radio-inline.disabledInside the
.form-check<label>.form-check-label<input>.form-check-inputtype = “radio”name = “ ~ same name for all the options ~ ”id = “ ~ unique ID ~ “value=” ~some value here ~ ”disabled<input>This is additionally the place to characterize if you desire the radio control to at first load as checked once the web page gets loaded. In case this is certainly what you're looking for-- as an alternative to
disabledchecked<input>checkedCheckbox plus Bootstrap Radio Css as an examples
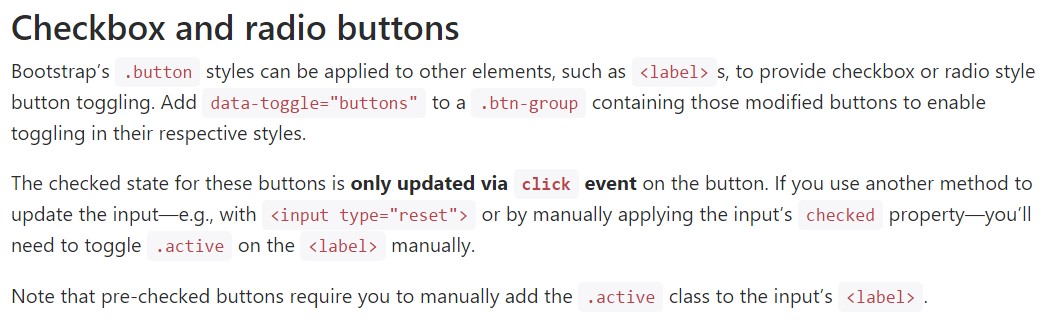
Bootstrap's
.button<label>data-toggle=" buttons".btn-groupTake note that pre-checked buttons need you to manually incorporate the
.active<label>Checkbox

<div class="btn-group" data-toggle="buttons">
  <label class="btn btn-primary active">
    <input type="checkbox" checked autocomplete="off"> Checkbox 1 (pre-checked)
  </label>
  <label class="btn btn-primary">
    <input type="checkbox" autocomplete="off"> Checkbox 2
  </label>
  <label class="btn btn-primary">
    <input type="checkbox" autocomplete="off"> Checkbox 3
  </label>
</div>
Radio

<div class="btn-group" data-toggle="buttons">
  <label class="btn btn-primary active">
    <input type="radio" name="options" id="option1" autocomplete="off" checked> Radio 1 (preselected)
  </label>
  <label class="btn btn-primary">
    <input type="radio" name="options" id="option2" autocomplete="off"> Radio 2
  </label>
  <label class="btn btn-primary">
    <input type="radio" name="options" id="option3" autocomplete="off"> Radio 3
  </label>
</div>
Radio button opportunity
In the event we want the user to select only one of a series of methods, we are able to use input components of the radio option. ( useful source)
In the event that there is more than a single element of this one form along with the exact same value inside the name attribute, only one may be selected.

<div class="row">
  <div class="col-lg-6">
    <div class="input-group">
      <span class="input-group-addon">
        <input type="checkbox" aria-label="Checkbox for following text input">
      </span>
      <input type="text" class="form-control" aria-label="Text input with checkbox">
    </div>
  </div>
  <div class="col-lg-6">
    <div class="input-group">
      <span class="input-group-addon">
        <input type="radio" aria-label="Radio button for following text input">
      </span>
      <input type="text" class="form-control" aria-label="Text input with radio button">
    </div>
  </div>
</div>
Final thoughts
Essentially this is the strategy the default radio switches get specified and do a job throughout within Bootstrap 4-- in a moment all you need to have are some solutions for the users to choose from.
Check a few on-line video short training about Bootstrap Radio Button:
Linked topics:
Bootstrap buttons approved documents
Bootstrap Radio button - information

Checkbox radio buttons break entire toolbar styling
